| Help Contents | ||||||||||||||||||||
 | ||||||||||||||||||||
Introduction
Want to contribute to TibiaWiki by making screenshots? Need some help perfecting them? This guide will give you some answers and tips to improve your screenshot quality.
Software used in this Guide
This guide will use GIMP (free/open source image editor). Image editing can be done in other software, such as Adobe Photoshop, but the free alternative is used here.
Image Formats
At the present, TibiaWiki uses the following image formats:
- .gif for all screenshots that are animated, and for all NPCs, items and objects, whether animated or not.
- .png for icons, maps and (mostly unused) full-quality screenshots.
- .jpg for lossy images. This format should be preferred on spoilers where quality is not paramount. If possible, a high quality .png version should be available for future editing.
NPCs, Objects, Items
NPCs using the Outfiter
Note: The Outfiter uses modern web technology such as AJAX and HTML5 Canvas. If your browser does not support it, you are advised to update or change it.
TibiaWiki's Outfiter can be used to create the frames of NPCs with proper lighting. If you can find the color scheme of the NPC, this method if preferred. If you can't, read below for a (harder) in-game method.
Using the NPC Hoggle as an example (because of the simple outfit), this is what you want him to look like:
- The first step is to open the Outfiter in a new browser window/tab. It might take a few seconds to load all code but if it works you'll see a grey rectangle similar to the in-game outfit selector window.
- To generate a high quality image you must uncheck the checkbox Soft Image. It will look like nothing happened to the white citizen guy in the top left corner, but on the background something did change.
- Since our NPCs have HP bars, check the checkbox saying HP Bar.
- Now you have to make the model look south, to do this rotate them once, clockwise, by clicking on this button:

- Type in the name of the NPC in the input field below char name. In this case you type Hoggle. The name should appear above the HP Bar of the NPC, just like it would in-game.
- Next we'll have to give the model the correct outfit. This can be done by clicking on the left arrow button or right arrow button until the outfit name matches the one required. These buttons can be found below the outfit image:

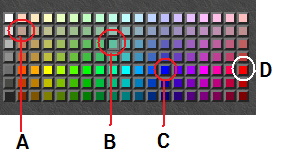
Of course, you must know exactly which outfit the NPC has, this can be done by finding the NPC in-game and take a good look or by trying to find an image on the internet, containing the NPC (e.g. a quest screenshot of somebody). In our example with Hoggle the default, which is the citizen outfit, is fine. - Now that we have the right outfit with a HP Bar, a name and looking south, the only thing that remains is assigning the correct colors. For this you need to know the colors, by viewing the NPC in-game and comparing or viewing a screenshot containing the NPC from the internet. This is probably the hardest step, since you can't always see exactly what colors are used. In our example we need for the Head, Primary, Secondary and Detail the colors A, B, C and D highlighted in the following image:

If we see the location of the color checkboxes as x and y coordinates and the black one in the bottom left corner as (0,0) the colors A, B, C and D used in our example are (1,5), (8,4), (12,2) and (18,2) but this might be a bit harder to understand. In that case the image says enough. It helps to zoom in to compare the colors of the desired image and the one you are comparing with. - Everything is done now. You can right-click on the NPC image you just created on the Outfiter page and choose save image as... or choose view image. You will now see the image has high quality and not the poor (scaled) quality you saw during the process. This is because of the first thing we did in step 2. Before uploading the image to TibiaWiki, make sure it has the correct name and gif extension. You are done now.

NPCs In-game Method
If the outfiter method fails for some reason you can always use the manual, in-game method. This is considerably harder and more error prone, but it is viable.
- Find the NPC.
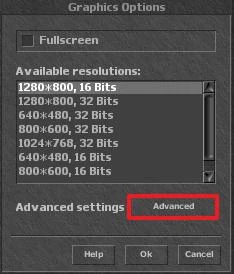
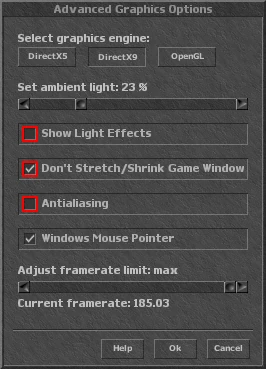
- On the stand-alone client, go into options > graphics > advanced. Check Don't Stretch/Shrink Game Window, and uncheck Show Light Effects.


These settings remove light effects generated by any lights source and will display original colors.
Now go back to the game, in most cases your game window has become smaller. Note the differences between the two:
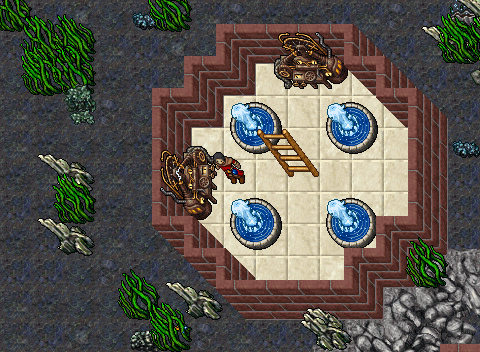
- Now the circumstances are good you can almost take the screenshot, be aware that if you take a screenshot of a NPC he/she must be facing south, with his face fully visible from the front like this one:
 . Also if you make a screenshot of an Object it must be fully visible, no other objects must hang before it. If you can move the object, if it is an Item you better place it on a background which is flush and has a contrast with your item. Example: if you have a dark item you can put it in the desert which is light.
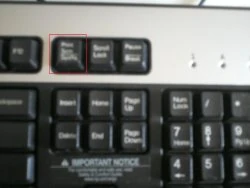
 - Now, take the screenshot by pressing the PrntScr key (Print screen).

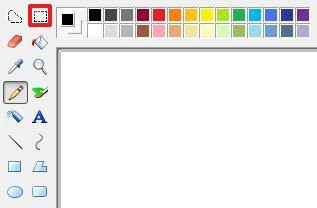
- After pressing on this key it will look like nothing happened, that's because you need to paste your screenshot first. Open an image editor like Paint and paste (Ctrl+V). Your screenshot will now appear in Paint. Press the button to select an area

(marked red in picture) and select a square around the object from which you want to make a screenshot. You can have a bit of background around your object when selecting the square, this is easier and you can always remove it later. - Now you press your right-mouse-button on your selected square around your screenshot object. Select the option copy to... and then select the place where you want to save it, e.g. D:\pictures\tibia\screenshots also select the file extension which is probably set default to .bmp or .jpg . It is best to change this to .png because otherwise you might lose image quality.

- The only thing that remains is clearing the background, if you want to make a good picture you must make the background transparent. In order to do this you must have a program which is not standard included in windows, there are different programs which can do this. I prefer GIMP which can be downloaded here. Simply click on download and you will be redirected to another download page, there you can download it. After downloading you must install it. I won't explain to much about that, if you have specific questions you can always ask it here or on the talkpage of this page.
- After downloading, start the Gimp and click on file --> open... or simply Ctrl+O. Select your screenshot from where you saved it and it will appear in a new window. Set this window to full-screen and zoom in (view --> zoom --> zoom in) as far as possible without having to scroll. So you must be able to still see the whole screenshot at once.
- Now select Layer --> Transparency --> Add Alphachannel. It will look like nothing happened but this option will cause the background to be transparent when erased instead of the default white when erased.
- Now press ⇧ Shift+E to select the eraser tool and erase the bigger space around your object. Alternate you can press F (Free Select Tool) and draw a line around your NPC/Object/Item. Then press Ctrl+I to invert the selection. Now simply press Del (Delete) on your keyboard to remove the background.
Note: you can always Ctrl+Z infinite, don't be afraid to experiment! - When you're ready with this open the first GIMP window again and select Circle (01).


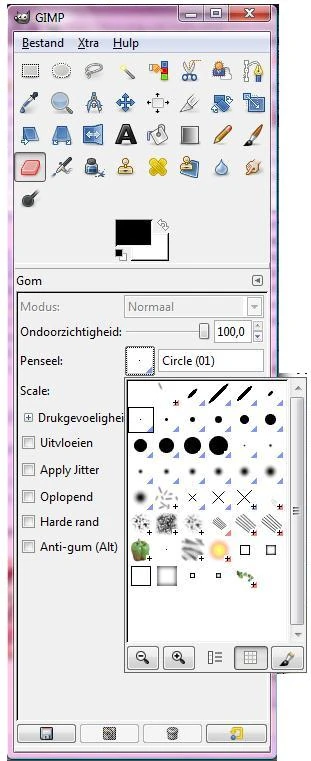
When you do this the eraser will be 1 pixel big so you can erase the details. Go back to your image window and zoom in till 3200%. Now simply erase the background around your object. This can be quite simple because objects in Tibia mostly have a black border around itself, just erase around the black border and it will be ok. Don't worry to much about a pixel being wrong, if you zoom back till 100% you won't see that.
- After finishing the erase work the picture needs to be resized in the good size. The best thing to do is resize it till 32x32 or 64x64 (or 32x64, 96x96, 128x96 etc). Of course this isn't always possible so don't worry too much about it. In order to resize press the key R (rectangular) and select the area you want to have the new size. The best is to do this when zoomed in 800%. When you have selected the rectangular press the right-mouse-button on your selection and choose Image --> Crop to Selection.
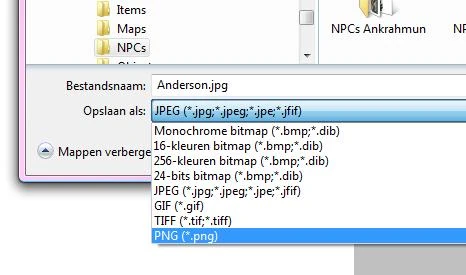
- Now everything is done it needs to be saved, press Ctrl+⇧ Shift+S (save as) and choose the correct name (beginning with a Capital!) and as extension you choose .gif e.g. Anderson.gif
- Now it's ready to be uploaded, you did a good job!
Making animated images
 How does the Behemoth move in this image?
So how do you make such an animated image? You have to follow the first section and make a screenshot of every frame, for the Behemoth you would have to make 2 screenshots. Then you need to clear the background of both images as described in the first section and save both. Continuing using the GIMP you would put them in the right sequence and save as an animated image.
- Because this is easier to explain with an example I will use NPC Edala as an example. First of all take the 2 screenshots:
 and
and 
Clear the background first roughly: and
and 
Now it would be easier (but is optional) to save you images as .gif, closing them, and opening them again. This will separate all pixels so you can see them much clearer. Then erase pixel-by-pixel to get this: and
and 
- Now we are at the point we finished and things become getting interested. Close your 2 images and open a new one by pressing Ctrl+N. In the open menu choose the size, with NPCs you can forget the 32x32 (or multiplications of them) rule and choose the image size of both images, in this case 32x48.
- Now we need to combine both images to become one, moving one. Press Ctrl+Alt+O (open image as layer) and choose your first image, Edala1.gif in our case. Do this again for Edala2.gif .
- Now press PgDn (Page Down) on your keyboard 3 times (or more, depending on the amount of imported layers) to get on the your first layer, the background one. Then press Layer --> Delete Layer. If you had transparency added to all imported images and you did this step correctly the white background will disappear (because you deleted it) and the transparent grey-blocked background will appear instead.
- In this example it won't be necessary but it might be in other cases. Every layer must be as big as the image size. E.g. if you had 3 layers of 24x18 and you choose your new image to be 32x32 this action would be necessary. Press Layer --> Layer to imagesize. Press PgUp to go to the next layer and repeat for every layer.
- Now your image is ready to save. Press Ctrl+⇧ Shift+S (save image as). Choose the image name, Edala.gif in this case and press Save. Now you can choose between some options, choose Save as animation and hit enter (or press export). Now you have to make some settings.
- Delay: Choose 500 milliseconds as delay (in most cases).
- Frame disposal: Choose one frame per layer (replace)
- Use delay entered above for all frames --> check this option.
- Use disposal entered above for all frames --> check this option.
- Now just click Save and you are done. The result looks like this

Note: you can also manually change these settings for every layer, if you want the delay to differ from layer to layer. For most tibia animations this is not needed though.


Making House/Guildhall images
...
Making Map images
To get the best result into making map images it is not recommended to take screenshots from the minimap in your client. It is advised to download one of the available tibia map viewers, which combines all your map files in one big files which makes it easier to view and make screenshots. The one recommended can be downloaded here, only note that TibiaWiki can not guarantee it's safety.
- After downloading the map viewer just go to the floor you want to make a map image of, zoom in correctly and click on Prt Sc.
- Now open Paint or a similar program and paste (Ctrl+V) your printed screen. Select the part you want to use and click on cut to selection or something like that.
- You can cut out non-relevant parts of the screenshot until only the needed map remains. Adding the exact floor as text or (if it is a route) a line with the path can be useful.
- Now comes the most important part, save your image in .png format NOT in .jpg, which will reduce the quality unneeded. Also use lowercased preferably.
- Now it is ready to upload to tibiawiki. Remember to not only upload it, but also link it on the required page, because unused pictures will be deleted (since they have no purpose).
Making Screenshots
Outfits
For Outfits the default color scheme should be used, that is, the default colors a character has when created.
